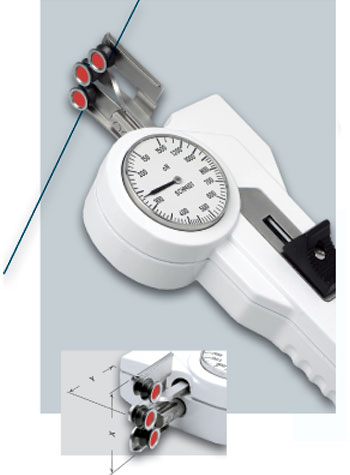
DXV Tension meter with measuring head rotated by 90º
 This special design provides easier reading when the standard design makes dial reading difficult. The measuring head is rotated by 90º for this purpose.
Note: This model does not include a material thickness compensator
Features
- Provides easier reading when the Model DXE makes dial reading difficult
- Special finger support located on the rear side reduces the effort to move the outer roller assembly
- Built-in mounting holes permit fixed installation for continuous tension measurement
- Each instrument is individually calibrated for highest accuracy
- Rugged aluminum housing
- Small, ball-bearing mounted, V-grooved guide rollers
- Filament guide and roller shifting mechanism ensure easy acquisition of the running material
- Everything in operator's view:
- the guide rollers
- the measured material
- the readings - 41mm Ø scale
- Certificate of Compliance with the order 2.1 according DIN EN 10204 is included
- Optionally available: Inspection Certificate 3.1 according DIN EN 10204 with calibration report
| Model | Ranges | Measuring Head Width X* approx. mm | Measuring Head Length Y approx. mm | SCHMIDT Calibration Material** | |
| DXV-50 | 10-50 | 38 | 38 | PA: 0.12 mm Ø | |
| DXV-120 | 20-120 | 38 | 38 | PA: 0.12 mm Ø | |
| DXV-200 | 20-200 | 38 | 38 | PA: 0.12 mm Ø | |
| DXV-400 | 20-400 | 38 | 38 | PA: 0.20 mm Ø | |
| DXV-1000 | 50-1000 | 40 | 38 | PA: 0.30 mm Ø | |
| DXV-1500 | 150-1500 | 40 | 38 | PA: 0.30 mm Ø | |
| DXV-2000 | 200-2000 | 40 | 38 | PA: 0.50 mm Ø | |
| Other tension ranges available on request. Other units of measure available, such as g. * Width of bracket assembly ** Suitable for 95% of applications - PA = Polyamide Monofilament Special calibration using customer supplied samples is recommended, if process material differs significantly from the SCHMIDT calibration material in diameter, rigidity or shape. For this purpose a material sample of about 5 m should be supplied. | |||||
Specifications
| Calibration: | According to SCHMIDT factory procedure |
| Accuracy: | ±1% full scale or ±1 graduation on scale |
| Scale diameter: | 41 mm |
| Temperature range: | 10-45ºC |
| Air humidity: | 85% RH, max. |
| Housing material: | Die-cast aluminum |
| Housing dimensions: | 188 x 85 x 45 mm (L x W x H) |
| Weight, net (gross): | approx. 470 g (1000 g) |

