DTX Advanced Digital Tension Meter with USB-interface
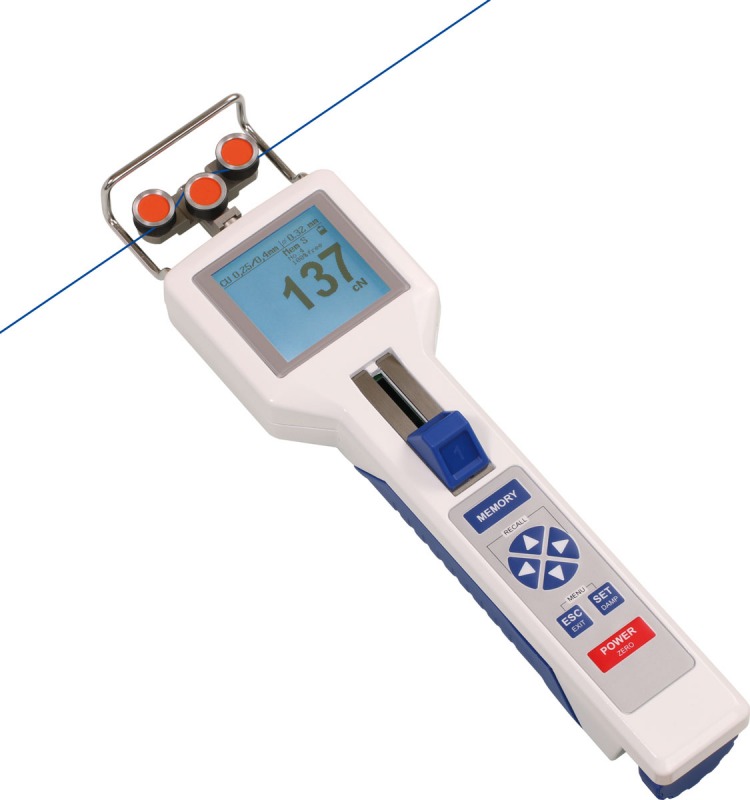
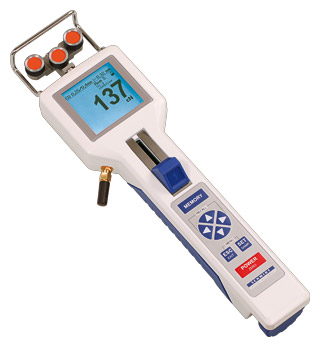
 The digital hand-held DTX tension meter is an advanced version of the DTS basic unit. Its different rollers combined with its wide measuring ranges make it the perfectly adjustable tool for applications in the textile, carbon fiber and wire industry. 12 measuring ranges from 0.2 - 200 cN up to 0.6 - 60 daN cover a large variety of applications and the built-in material thickness compensator and calibration adjustment allow also for the calibration of materials that deviate from the calibration standard.
The DTX series provides advanced statistical functions such as:
Mode S: Statistics only mode
Mode H: Store X-Y graph to the data storage for later inspection
Mode C: Continuous logging mode. User definable measuring time and measuring series with 2 Hz
Mode F: Fast Continuous logging mode. Same as C with 1000 Hz
Furthermore, data can be analyzed directly and thanks to its backlit, rotatable LCD display easy reading is ensured under every condition. Just like the DTS basic unit, the DTX also permits storage of customer-made calibrations. On the DTX 4 calibrations can be stored.
The large data storage for 60.000 readings combined with the USB interface and the included data analysis software facilitate real-time readings as well as the creation of reports required for quality reporting systems, mandated under the strict ISO 9000 guidelines.
Features
- Automatically in 90° steps rotatable LCD Display
- Highest precision issued by built-in material thickness compensator and calibration fine tuning
- User defined MIN and MAX values with optical alarm
- User defined configuration allows to adjust it exactly as required
- High measuring frequency of 1 kHz (1000 measuring/sec.), intern 8 kHz
- Advanced statistical calculation functions
- Data Storage for 60.000 readings
- USB data output
| Model | Range / Resolution | Head Width mm* | Calibration Material PA** | Textile Industry Applications | Wire Industry Applications | Material-thickness Compensator |
| DTX-200 | 0.2 – 200.0 / 0.1 cN | 66 | max. 0.12 mm Ø | max. 200 tex | max. 0.15 mm Ø | |
| DTX-500 | 0.5 - 500 / 0.1 cN | 66 | 0.12 + 0.20 mm Ø | max. 500 tex | 0.05 – 0.25 mm Ø | |
| DTX-1000 | 10 – 1000 / 1 cN | 66 | 0.20 + 0.40 mm Ø | max. 1000 tex | 0.10 – 0.40 mm Ø | |
| DTX-2000 | 20 – 2000 / 1 cN | 66 | 0.40 + 0.70 mm Ø | max. 2000 tex | 0.30 – 0.60 mm Ø | |
| DTX-2500 | 25 – 2500 / 1 cN | 116 | 0.40 + 0.70 mm Ø | max. 2500 tex | 0.30 – 0.70 mm Ø | |
| DTX-4000 | 40 – 4000 / 1 cN | 66 | 0.50 + 0.90 mm Ø | max. 4000 tex | 0.35 – 0.90 mm Ø | |
| DTX-5000 | 50 – 5000 / 1 cN | 116 | 0.60 + 1.20 mm Ø | max. 5000 tex | 0.40 – 1.00 mm Ø | |
| DTX-10K | 0.1 – 10.00 / 0.01 daN | 116 | 0.80 + 1.40 mm Ø | max. 10000 tex | 0.70 – 1.40 mm Ø | |
| DTX-20K | 0.2 – 20.00 / 0.01 daN | 166 | 1.20 + 1.80 mm Ø | max. 20000 tex | 1.00 – 1.80 mm Ø | |
| DTX-30K | 0.3 – 30.00 / 0.01 daN | 216 | 1.40 + 2.20 mm Ø | max. 30000 tex | 1.20 – 2.00 mm Ø | |
| DTX-50K | 0.5 – 50.00 / 0.01 daN | 216 | steel rope 1.5 mm Ø (7 x 7 x 0.2) | max. 50000 tex | 1.40 – 2.20 mm Ø | |
| DTX-60K-V1 | 0.6 – 60.00 / 0.01 daN | 280 | steel rope 2.0 mm Ø (7 x 7 x 0.3) | max. 60000 tex | 1.80 – 3.00 mm Ø | |
| All models except the DTX-200, DTX-50K and DTX-60K-V1 are equipped with a built-in material thickness compensator * Depending on model, either width of filament guide or outer distance between outside guide rollers ** Suitable for 95 % of applications - PA = Polyamid-Monofilament | ||||||
| Order-Code | Line Speed vmax. … m/min | Roller Material |
|---|---|---|
| Standard | 4000 | Hardened steel (max. Ø 4mm) |
| Code K | 3500 | Hard-coated aluminium |
| Code H | 5000 | Plasma-coated aluminium |
| Code T | 1000 | Plastic (POM) black |
| Code W | 1000 | Nickel-plated steel |
| Code ST | 1000 | Hardened steel |
| Code B | 1000 | Tempered steel |
| Code CE2 | 1000 | Aluminium ceramic-coated |
| Code ASY | 1000 | Hard-coated aluminium, asymmetrical groove (not for model DTS-200) |
| Code ASYB | 1000 | Tempered steel (for tire code), asymmetrical groove (not for model DTS-200) |
| Code V1 | 1000 | Hard-coated aluminium (only for model DTS-60K-V1) |
| Code U | 2000 | Hard-coated aluminium, radius R3 (not for model DTS-200) |
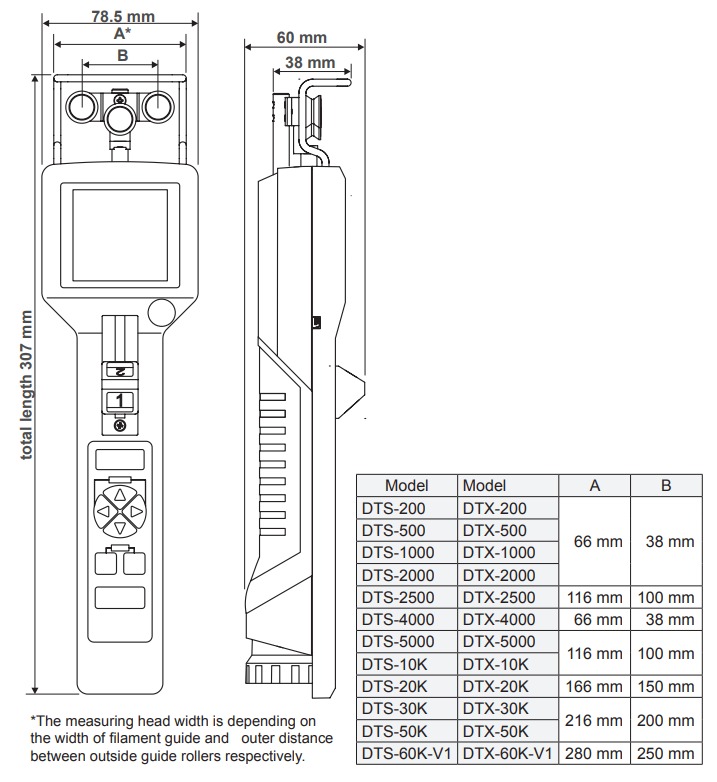
Dimensions
| Code MH - Online Mounting | |
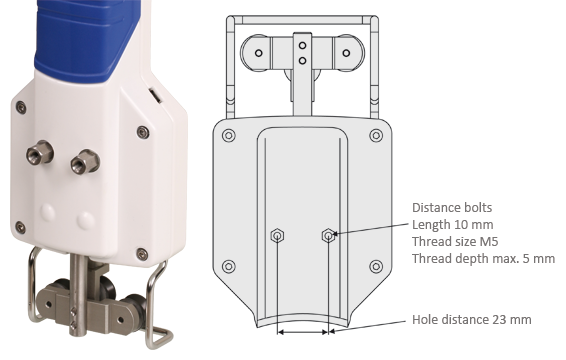 |
To mount the gauge for online use, the housing can be equipped with mounting threads. There are to bolts with M5 female thread on the rear side. This feature cannot be installed afterwords. |
| Code WL - Wi-Fi Signal | |
 |
The DTX can be equipped with a Wi-Fi module for WLAN data transfer. This feature cannot be installed afterwards. The Wi-Fi module is not licensed for all countries. Please contact us for further information! |
Specifications
| Accuracy: | For standard material from 5 % up to 100 % of FS: ± 0.5 % FS ± 1 digit remaining tension range and other calibration materials: ±3 % full scale and ±1 digit |
| Overrange: | Approx. 10 % FS*, full scale, without accuracy guarantee |
| Overload protection: | 100 % full scale |
| Memory for material curves: | 4 for standard calibration plus 4 for customized calibrations |
| Data storage: | For 60.000 readings |
| Measuring units: | Force (switchable): cN, daN, g, kg, N, lb Thickness (switchable): mm, inch |
| Measuring principle: | Strain gauge bridge |
| Signal processing: | Digital, 16 bit A/D converter |
| Measuring frequency: | Max. 1 kHz (1000 measurings/sec.), intern 8 kHz |
| Measuring roller deflection: | Max. 0.2 mm |
| Display: | Graph LCD |
| 3 different displays: | Numeric Numeric with graph (time-tension) X-Y-diagram |
| Display update rate: | Approx. 2 times per second |
| Memory: | MIN, MAX, PEAK, AVG and LAST |
| Output: | clase= fa fa USB ariahidden verdadero"> USB PC-Software included |
| Data storage modes: | 4 modes with statistical evaluation |
| Damping: | Adjustable electronic damping (averaging) |
| Cal. Adjustment: | ± 10 steps in 1 % increment |
| Thickness compensator: | Max. 2.5 mm (not available for DTX-200, DTX-50K and DTX-60K-V1) |
| Auto power off: | Approx. 3 minutes of non-use |
| Temperature coefficient: | Gain: less than ± 0.01 % FS* /°C |
| Zero point: | less than ± 0.03 % FS* /°C |
| Temperature range: | 10 – 45 °C |
| Air humidity: | 85 % RH, max. |
| Power supply: | LiPo accumulator (approx. 40 h continuous use), charging time approx. 3 1/2 h AC adapter 100 – 240 V AC,adapter (EU, USA, UK) |
| Housing material: | Die-cast aluminum |
| Housing dimensions: | As per above shown dimensions sheet |
| Weight, net (gross): | Up to DTX-50K approx. 875 g / 1550 g DTX-60K-V1 approx. 1040 g / 2700 g |
Buy Now
Availability: Available: 1 - 3 days, Delivery time: 1 - 3 weeks, special order request

